

Emailing a photo to yourself to get it from your iPhone onto your Mac works, but it’s slow, it compresses your images, and it clutters your inbox. AirDrop does the same job in seconds, at full quality, without the internet and without cables.
This guide covers how to set AirDrop up on both devices, send files in both directions, find where they land, and fix it when it refuses to work, which is the part most guides skip.
Quick Answer
To AirDrop from iPhone to Mac, make sure both devices have Wi-Fi and Bluetooth on and AirDrop set to at least Contacts Only. Then open the photo or file on your iPhone, tap the share button, tap AirDrop, and select your Mac. The file lands in your Mac’s Downloads folder.
What You Need Before You Start
AirDrop has a few requirements, and nearly every “AirDrop not working” problem comes from one of them.
- Both devices must have Wi-Fi and Bluetooth turned on.
- They must be within about 9 metres (30 feet) of each other.
- Personal Hotspot must be off on the iPhone, because it uses the same radio.
- AirDrop must be set to Contacts Only or Everyone for 10 Minutes, not Receiving Off.
- For Contacts Only to work, both devices must be signed in to iCloud, and each person must be in the other’s Contacts with the email or phone number linked to their Apple Account.
If both devices are yours and signed in to the same Apple Account, they’ll see each other even without being in Contacts.
Step 1: Set Up AirDrop on Your iPhone
- Open Settings.
- Tap General.
- Tap AirDrop.
- Choose Contacts Only or Everyone for 10 Minutes.
You can also control this quickly from Control Centre: press and hold the connectivity panel (the box with Wi-Fi and Bluetooth), then tap AirDrop.
Everyone for 10 Minutes is deliberately temporary, so you can’t accidentally leave your iPhone open to strangers. If you’re in a public place, use Contacts Only.

Step 2: Set Up AirDrop on Your Mac
- Open Finder.
- Click AirDrop in the sidebar.
- At the bottom of the window, set Allow me to be discovered by to Contacts Only or Everyone.
Leaving the AirDrop window open while you transfer makes your Mac more reliably discoverable, which is a useful trick when devices aren’t finding each other.
You can also set this from Control Centre in the menu bar, under AirDrop.

Step 3: Send a File from iPhone to Mac
- Open the photo, video, or file on your iPhone.
- Tap the share button (the square with an arrow pointing up).
- Tap AirDrop.
- Wait a moment, then tap your Mac’s name when it appears.
- On the Mac, click Accept if prompted.
To send several photos at once, open Photos, tap Select, choose the photos, then tap the share button.
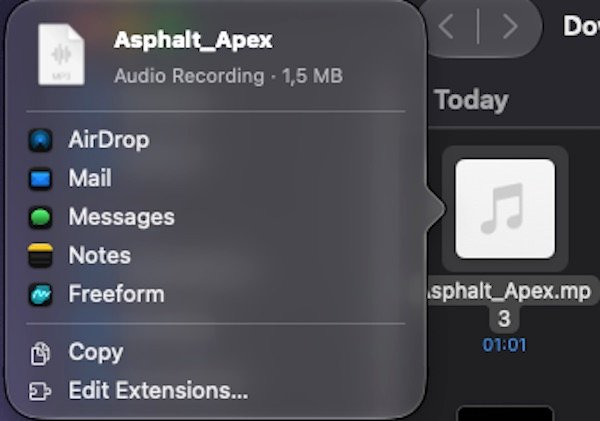
Files sent to your Mac go into the Downloads folder by default. Photos and videos open in Preview or the app associated with that file type.

Sending 1 photo from my iPhone 14 Pro Max to my Mac took about 3 seconds, and they appeared straight in the Downloads folder.
Step 4: Send a File from Mac to iPhone
There are two easy ways.
Using the share menu:
- Select the file in Finder, or open it.
- Click the share button in the toolbar, or right-click and choose Share.
- Choose AirDrop.
- Select your iPhone.
Using the AirDrop window:
- Open Finder → AirDrop.
- Drag the file onto your iPhone’s icon in the window.
On the iPhone, the file opens in the matching app: photos go to the Photos app, PDFs offer to open in Files or Books, and documents open in their app.
Where AirDropped Files Are Saved
This trips people up constantly.
- On your Mac: everything lands in the Downloads folder, regardless of file type.
- On your iPhone: photos and videos go to the Photos app. Other files prompt you to choose an app, and documents saved to Files appear under On My iPhone → Downloads.
If you can’t find a file you just received on your Mac, open Finder, click Downloads, and sort by Date Added.
Fixing AirDrop When It Doesn’t Work
Work through these in order.
1. Check the basics. Wi-Fi and Bluetooth on, both devices unlocked and awake, and within a few metres.
2. Turn off Personal Hotspot on the iPhone, in Settings → Personal Hotspot. This is the most common hidden cause.
3. Switch to “Everyone for 10 Minutes” temporarily on both devices. If it works, the problem is your Contacts setup rather than AirDrop itself.
4. Check Do Not Disturb or a Focus mode, which can suppress the incoming request.
5. Check your Mac’s firewall. Open System Settings → Network → Firewall → Options and make sure Block all incoming connections is turned off.
6. Turn Bluetooth and Wi-Fi off and on on both devices, then try again.
7. Restart both devices. This clears the majority of stubborn cases.
8. Keep the AirDrop Finder window open on the Mac while searching from the iPhone.
Is AirDrop Safe to Use?
AirDrop transfers are encrypted and happen directly between the two devices, without going through the internet or any server. The main risk isn’t interception, it’s receiving unwanted files from strangers in public places.
That’s why Everyone mode on iPhone automatically switches itself off after ten minutes. Keep AirDrop on Contacts Only by default, and always check the sender’s name before accepting a file.
Frequently Asked Questions
Does AirDrop use my mobile data?
No. AirDrop creates a direct connection between the devices using Wi-Fi and Bluetooth. It works with no internet at all.
Is there a file size limit for AirDrop?
There’s no fixed limit, but very large files take longer and are more likely to fail if the devices move apart during the transfer.
Does AirDrop reduce photo quality?
No. AirDrop sends the original file, which is one of its main advantages over messaging apps and email.
Why can’t my Mac see my iPhone in AirDrop?
Most often Personal Hotspot is on, one device is locked or asleep, or the Mac’s firewall is blocking incoming connections.
Can I AirDrop to a Windows PC?
No. AirDrop works only between Apple devices.
Conclusion
AirDrop is the fastest way to move files between your iPhone and Mac, as long as Wi-Fi, Bluetooth, and Personal Hotspot are set correctly. Remember that received files land in your Mac’s Downloads folder, and that leaving the AirDrop window open makes discovery far more reliable.
If your Mac feels sluggish while handling large transfers, our guide on how to speed up a slow Mac will help you find what’s using your resources.